Light Field Rendering on 3D Looking Glass Device - A Tutorial
An end-to-end system taking as input pictures of holograms captured from different positions using a handheld device such as a mobile phone and display the reconstructed hologram video on a 3D looking glass holographic display device.
Haoyu Wei, Tzujui Liu, Pengxiao Hao, Florian Willomitzer, Oliver Cossairt
EE 496, 2020 Win
Poster

Abstract
Motivated by the need of hologram conservation, we built an end-to-end system that takes as input pictures of holograms captured from different positions using a handheld device such as a mobile phone and display the reconstructed hologram on a 3D looking glass holographic display device. Concretely, we first expand images of a hologram to a light field with multiplane image scene representation, then we generate the complete light field information needed for the looking glass device to display the reconstructed holograms.
Method
Light Field Rendering
This part is based on the paper Mildenhall et al. 2019
-
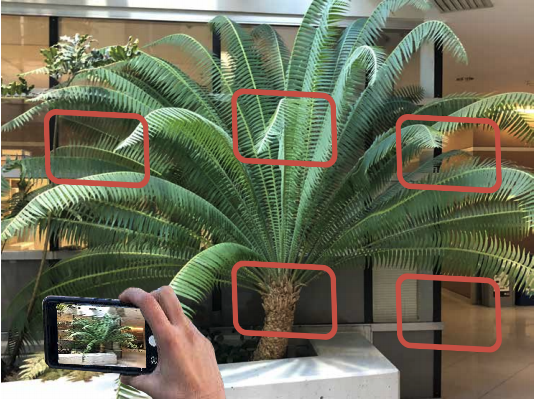
Taking Photos of your object.
The guideline is you should use images where the maximum disparity between views is no more than about 64 pixels (watch the closest thing to the camera and don’t let it move more than ~1/8 the horizontal field of view between images). I recommend at least 6 photos and 20-30 images would be the best.
-
System installation & Demo test
The instructions by the authors are published on github. Here is the way I’m doing and some supplement.
Clone the repo from github to your working folder. Make sure CUDA, docker and nvidia-docker are installed on your machine.
Run this in the base directory to download a pretrained checkpoint, download a Docker image, and run code to generate MPIs and a rendered output video on an example input dataset:
 # Download packages.
 bash download_data.sh
 sudo docker pull bmild/tf_colmap
 sudo docker tag bmild/tf_colmap tf_colmap

 # Run docker environment. (Change directories accordingly. Run this every time you restart your docker.)
 nvidia-docker run -it \
     --rm \
     -v /:/host \
     -v /dir/for/harddrive/data:/dir/for/data/in/docker/environment \
     --workdir /host$PWD \
     tf_colmap

 # Run demo in docker
 bash demo.sh
You should be able to see a video like this in
data/testscene/outputs/test_vid.mp4Troubleshooting:
- File or dir not found in docker environment: Check the directories mounted to docker when running the docker environment. Avoid starting docker and running script in the same line. This may cause path confusion in docker environment.
- Trouble running demo.sh: run python scripts line by line in demo.sh, check where the problem is. Or redownload test dataset from here to get new update.
-
test with your own images.
Create a working directory named
scenedirfor example, and make a data directory namedimagesinside it. Put your photos inimages. Thescenedircan be renamed as you like and placed in which ever dir path exists in docker. Butimagesfolder cannot be renamed.Check the format of your photos using
llcommand in linux. Make sure yourimagesdir contains only those images, and they ends with.png, .jpgor.JPGand in the corresponding format.Note, You can convert image format easily in a linux command, for example:
for file in *.png; do convert $file ${file/%.png/.jpg}; doneNow we can write our own bash script and try our photos. Here’s an example of mine.
CUDA_VISIBLE_DEVICES=0,1,2 python imgs2poses.py /host/mnt/scenedir/ CUDA_VISIBLE_DEVICES=0,1,2 python imgs2mpis.py \ /host/mnt/scenedir/ \ /host/mnt/scenedir/mpis_720 \ --height 720 mkdir /host/mnt/scenedir/outputs python imgs2renderpath.py \ /host/mnt/scenedir/ \ /host/mnt/scenedir/outputs/xaxis_path.txt \ --x_axis cd cuda_renderer && make && cd .. cuda_renderer/cuda_renderer \ /host/mnt/scenedir/mpis_720 \ /host/mnt/scenedir/outputs/xaxis_path.txt \ /host/mnt/scenedir/outputs/xaxis_vid.mp4 \ -1 .8 0CUDA_VISIBLE_DEVICES=0,1,2specifies which GPU to use. Other parameters are described in ‘General step-by-step usage’ in the author’s github.Troubleshooting:
- PyramidCU::GenerateFeatureList: an illegal memory access was encountered: Some machine configurations might run into problems running the script imgs2poses.py. Try different GPUs in
CUDA_VISIBLE_DEVICES=0,1,2. If the issue persists, try uncommenting this line to stop COLMAP from using the GPU to extract image features. - Error running the script: Check
colmap_output.txtinscenedir. If there are images not registered or not paired, it might be the photos do not accord with the guidelines of the system, or image format is incorrect.
- PyramidCU::GenerateFeatureList: an illegal memory access was encountered: Some machine configurations might run into problems running the script imgs2poses.py. Try different GPUs in
-
Collect light field images.
Here is a python script I wrote to cut all the frames from the video we got.
import cv2 import os # TODO: Please change the directories outdir = '/Users/haoyuwei/Desktop/splittedvid_lion/' video_dir = '/Users/haoyuwei/mnt/scenedir/outputs/xaxis_vid.mp4' cap = cv2.VideoCapture(video_dir) try: if not os.path.exists(outdir): os.makedirs(outdir) except OSError: print('Error: cannot create dir of output data.') id = 0 while(True): ret, frame = cap.read() fn = outdir + str(id) +'.png' print('Creating...' + fn) cv2.imwrite(fn, frame) id += 1 -
Put images to Looking Glass Device
For installation of the Looking Glass Device, please refer to the official documentation here. Then, download the HoloPlay Service software here and follow the instruction in the official website here.
After you successfully connect the Looking Glass Device, download the lightfield photo app.
After installation, navigate to the folder where you installed the app, create a new folder in Lightfield Photosets, copy all the light field images we get from the previous step into the folder. Activate the app, then you should see a new photoset in the app. Click it, then click choose photos, and select all the lightfield images in that folder. You should see the images being loaded onto the Looking Glass Device. Click Set Croping, and adjust the focus and field of view for best display effects.
For additional informations, please refer to the official documentation in here.